How to configure AWS-SES as an Email service provider?
1. Configure Identity
Identity - An email address or domain that Amazon SES users use to send the email.
The 2 ways to configure Identity:
- You can configure the entire domain
- You can configure a specific email id
1. Domain Configuration:
To add Domain
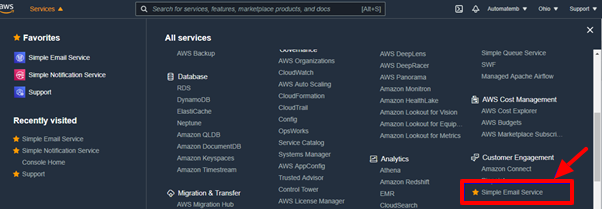
1. Go to the Simple Email Service management under Customer Engagement Block.
2. Click on the Domain section under Simple Email Service management.

3. This will open the Verify a new domain page, click on the “Verify a New Domain” button.

4. Verify a New Domain form will popup, enter respective Domain, click on verify this Domain button to verify.

5. Domain Verification record form will pop up, A window appears that contains the TXT and DNS records, that you must add to your domain's DNS configuration, and click on the close button.

For more details please refer:https://docs.aws.amazon.com/ses/latest/DeveloperGuide/verify-domain-procedure.html
For more details please refer:https://docs.aws.amazon.com/ses/latest/DeveloperGuide/send-email-authentication.html
6. System will take some time to get verify your domain.
1. Verification status is pending.

2. Once the verification is successful, the status would be changed to verified.

2. To add a New Email Address
1. Go to the Simple Email Service management under Customer Engagement Block.

2. Click on the ‘Email Addresses’ section under Simple Email Service management.

3. This will open the Verify a new Email Address page, click on the “Verify an Email Address” button.

4. Verify a New Email Address form will popup, enter respective Email id, and click on verify this Email Address button to verify.

5. Verification Email Sent notification will Popup Click on Close.

6. Now the system will send an automated email to mentioned Email id to verify the Email Id.

7. Open the Email and click on the link sent by Amazon web services.

8. This will open a Confirmation page such as ‘Congratulation’ successfully verified an email address.

9. Automatically Verification status will be changed as Verified.

2. SMTP Setting
After the Identity has been verified, we need to configure SMTP settings to retrieve our SMTP credentials and also to set up a link between AWS SES and automateCRM to track delivery statuses.
To Configure SMTP setting
1. Click on the ‘SMTP Settings’ section under Simple Email Service management.

2. This will open the SMTP Setting page, click on the “Create My SMTP Credentials” button.

3. This will open the Credentials creation page, enter the name of a new IAM user or accept the default name, and click on create button to set up SMTP credentials.

4. SMTP credentials created form will Pop up, this is the only time these SMTP security credentials will be available for download. Click on Download Credentials to Download.

3. Configure Simple Notification Services
An Amazon SNS topic is a logical access point that acts as a communication channel. When you publish a message on a topic, it outspread the message to all subscribed endpoints. Here we will create an SNS Topic to send the delivery status of emails back to automateCRM.
1. To Create topic
1. Go to Simple notification services Management under Application Integration Block.

2. Click on the ‘Topic’ section under Simple notification services Management.

3. This will open the Topics dashboard page, click on the “Create Topic” button.

4. This will open the Create Topics form with various Blocks, enter required details Topic Type as standard, Topic Name as "ses-automatecrm". Set Other option as default and Click on create topics Button to create Topic.

2. Create Subscription
Why Subscription to SNS is required?
SNS subscription has to be set up which creates a link to CRM so that the delivery status of emails can be sent back to CRM.
To Create Subscription
1. Click on the topic that we created in previous steps, "ses-automatecrm"

2. This will open the Detail view of the topic, click on the ‘create subscription’ button.

3. This will open the Create Subscription form, enter required details, Protocol as HTTPS from dropdown, Endpoint will be CRM URL Followed by “listeners/aws-ses.php”
Endpoint Example:https://mycompany.automatecrm.io/listeners/aws-ses.php
Set Other option as default and Click on create Subscription Button to create Subscription.

4. System will verify the endpoint/Subscription automatically and the status would be updated as confirmed upon successful subscription.

4. Configure SES-Configuration Set
Configuration sets are groups of rules that you can apply to the emails you send using Amazon SES.
1. To Configure a configuration set
1. Go to Simple Email Services Management under Customer Engagement Block.

2. Click on the ‘Configuration Sets’ section under Simple Email services Management.

3. This will open the Configuration set up page, click on the “create configuration set” button.

4. Create Configuration Set form will pop up, enter Configuration set Name as ses-automatecrm and click on Create Configuration Set button to create.

2. Configure Destination
Event destinations allow you to publish email sending metrics including the numbers of sends, deliveries, opens, clicks, bounces, complaints, etc.
To Add Destination
1. Once the user Created the Configuration set name, the list of Configuration set will be visible under Configuration set management, Click on the Configuration set from the list.

2. This will open the Edit Configuration Set page, click on the Select a Destination Type Dropdown button and select SNS.

3. SNS Destination form will pop up, enter required details Destination Name, select all the Event types, use Amazon SES default domain, select a preferred topic and then save.

5. Configure Identity to use the Configuration Set
1. Click on the ‘Email Addresses’ section under Simple Email Service management.

2. Select the email id/domain that you want to use.

3. This will open the Email addresses details page, click on the Edit configuration button under the Notifications Block.

4. Edit Notification Configuration form will pop, select "ses-automatecrm" (the one which we configured in the previous step) from Deliveries dropdown Field, and click on the save button to save the setting.

6. To Request production access
1. Click on the ‘Sending Statistics’ section under Simple Email Service management.

2. This will open the Your Account details page, click on Edit Your Account Details button.

3. Edit Your Account details form will pop up. Enter required details and click on submit for Review button.

4. Once the account is verified it will change to production mode.

SES Reputation Dashboard
You can monitor the number of emails delivered and rejected from your account, and percentage rates are displayed on the Sending Statistics page.
You can monitor reports about bounces and complaints on the Dashboard.
