How to Add New User?
To Add New Users follow the steps given below:
- Login as an Admin user
- Go to CRM Settings > User Management > Users.
- Click on the "Add user" button.

A. User Login and Role Block
| Fields | Description |
|---|---|
| User Name | Provide the User Name |
| First Name | Provide the First Name of the User |
| Password | Provide the appropriate Password |
| Admin | You can Enable/Disable the "Amin" by clicking on the checkbox |
| Default Lead View | The Default Lead View is that when a user opens the Leads Module, he/she can view the Default Lead View which is selected from the drop-down ( Today, Last 2 Days, Last Week ) |
| Primary Email | Provide the User's the valid email address |
| Last Name | Provide the Last Name of the User |
| Confirm Password | Confirm the password of the User by re-entering the password |
| Role | Select the appropriate Role of the user from the drop-do |
B. Currency and Number Field Block
The currency and Number field allows you to select the default Currency. Values shown for Currency Fields will be converted from Base currency to User's Currency.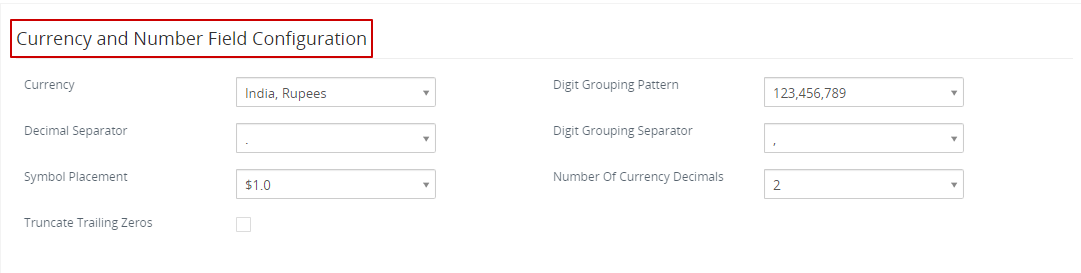
| Fields | Description |
|---|---|
| Currency | Select the preferred currency |
| Decimal Separator | Select the Decimal Separator to separate the integer and the fractional parts of numeric values |
| Symbol Placement | Whether you want to add before or after the amount |
| Truncate Trailing Zeros | Enable the checkbox to truncate extra zeros |
| Digital Grouping Pattern | Select the Digital Grouping Pattern which helps you to read the large numbers easily |
| Digital Grouping Separator | Select the Digital Grouping Separator, so that you can read the amount easily |
| Number of Currency Decimal | Select the number of decimal to be shown after the currency value |
C. More Information Block
You can provide additional information about the user in the "More Information" block.


| Field Name | Description |
|---|---|
| Title Field |
Provide the specific designation of the user |
| Department | Provide the specific Department of the user |
| Office Phone | Provide the Office phone number of the user |
| Mobile Phone | Provide the Mobile Phone number of the user |
| Home Phone | Provide the Home Phone number of the user |
| Internal Mail Composer |
|
| CRM Phone Extension |
CRM Phone extension allows you to handle incoming and outgoing calls from the CRM for each user, the extension number should be configured in the User preferences page |
| Left Panel Side |
You can enable the checkbox to hide the Left Panel Menu or disable it to show the Left Panel Menu |
| Fax | You can provide the fax number of the user |
| Other Email | Provider Other Email of the user |
| Secondary Email | You can provide an alternate email id of the user |
| Reports To | Select the user(subordinate) to whom the user reports to |
| Secondary Phone | Provide the alternate phone number of the user |
| Documents | You can add the documents of the user manually (Text Field) |
| Language | You can select the desired language from the drop-down |
| Default Record View | You can select Summary or the Detail view, whenever you click to view the record it takes you to |
Signature
In the Signature block, you can add a signature at the end of your emails example given below:


D. User Address Block
You can provide the address details of the users in the "User Address Block".

| First Name | Description |
|---|---|
| Street Address | Provide the specific street address of the user |
| City | Provide the name of the city of the user |
| State | Provide the specific state of the user |
| Country | Provide the specific country of the user |
| Postal Code | Provide the specific postal code of the user |
E. User Photograph Block
- You can upload and browse the user's photograph by clicking on the upload button.
- Click on Save to upload.

How to change Access Key?
The Access Key is a secret token that is used while performing API calls.
- Click on the "More" button and select "Access Key".


How to Change Username?
- Click on the User from the list view to Change Username.
- Click the "More" button on the top right corner of the page.
- Select "Change User".
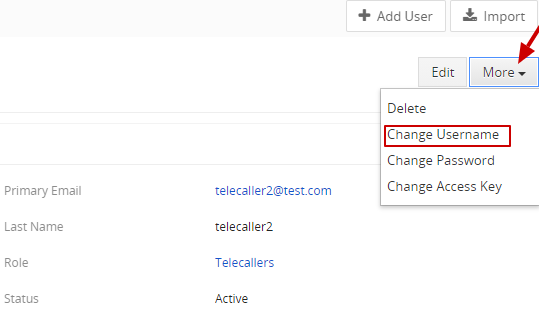
- In the "Change Username" Popup, provide the "New Username".
- provide "New Password" of the user.
- "Confirm the Password" of the user.
- Click on the Save button.

How to change the User Password?
As an Admin user, you can change your password and other user's password.
- Click the "More" button on the top right corner of the page.
- Select "Change Password".
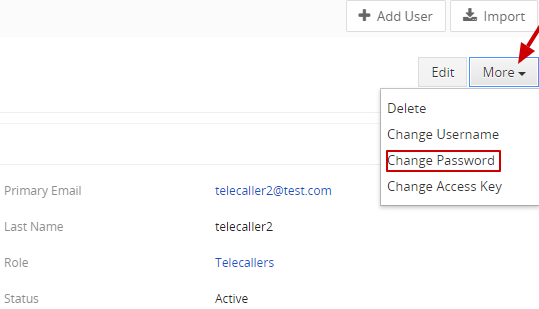
- In the Change Password Popup.
- Enter the "New Password" and "Confirm the Password" of the user.
- Click on the Save button.

How to Edit the User?
- Click on the User from the listview to edit the user.
- Click on the "Edit button".

- In the Editing User Popup, edit the details of the User.
- Click on the Save button.

How to Delete the User?
When a user is deleted, the user cannot access the CRM, they are marked as Inactive users. New records cannot be assigned to the users
To delete the user follow the steps given below:
- Go to the list view of the users > Click on the user that you want to delete.
- Click on the "More button" > Select "Delete" option.
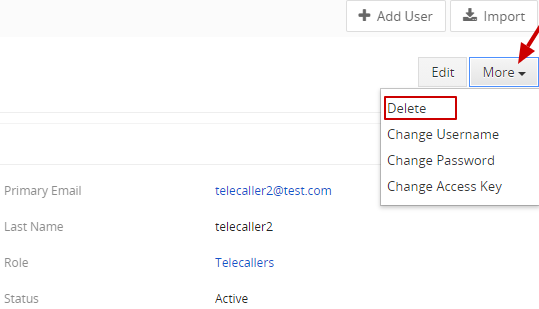
- In the Delete Popup, click on "Yes" to confirm to delete the user.

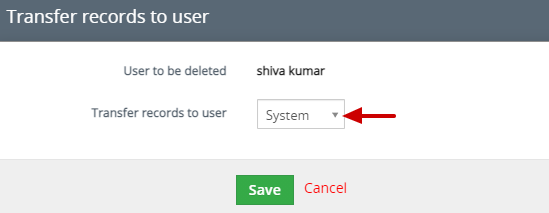
- It shows up in the "Transfer records to the user" popup.
When a user is deleted, then you must transfer their records to another user. - In the Transfer records to user" field, select the user from the drop-down to whom the records to be transferred.
- Click on the Save button.

How to delete the user permanently?
If you want to delete a user permanently when they are no longer use the CRM. However to delete a user follow the steps given below:
- Go to the list view of the users > Click on the user that you want to delete.
- Click on the "More button" > Select "Delete" option.
- In the Delete Popup, click on "Yes" to confirm to delete the user.
- In the "Transfer records to user" popup, enable the checkbox to "Delete User Permanently"
- Click on the Save button

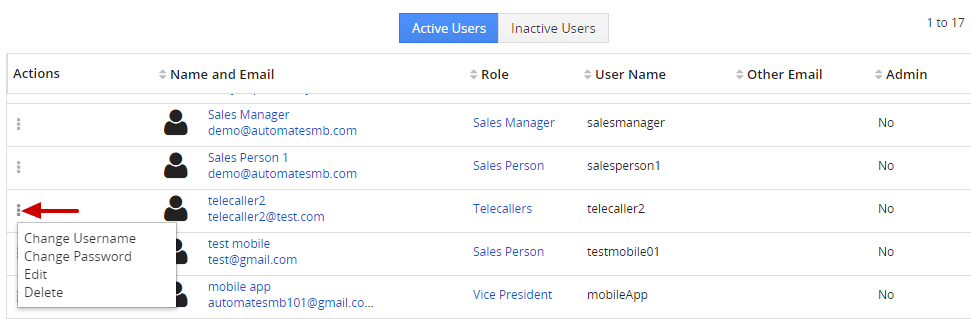
Alternatively, You can change your Username, Change Password, Edit User, Delete User.
- Go to CRM Settings > User Management > Users.
- Click on ellipse from the list view of the User.
- Select the Options.
How to make Users Inactive?
- Go to "Users List View" and Click on the particular User.
- Click on the "Edit icon" (Pencil icon).
- In the "Status field" select the Status as "Inactive" from the dropdown to make the user inactive.

- You can View Inactive Users by clicking on the Inactive Users button on top of the list view page of the user.

How to Restore the Inactive users?
- Click on the Inactive button from the top listview of the user's page.
- Click on the ellipse icon and select the "Restore User" option.
- In the popup click on "Yes".

How to Delete the Inactive users?
- Click on the Inactive button from the top listview of the user's page.
- Click on the ellipse icon and select the "Delete" option.

- Select the user from the drop-down to "Transfer records to the user".
- Click on the Save button.
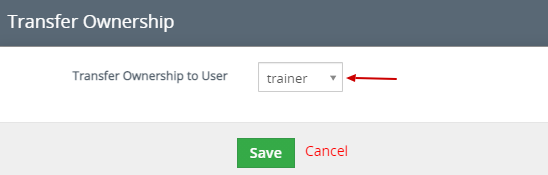
How to Change the Owner of the user?
You can transfer the ownership of the CRM account from one user to another user, to do that follow the steps given below:
- Click on Settings on the top right corner of the user list view page.

- Select the "Transfer Ownership to User" from the drop-down.
- Click on the Save button.
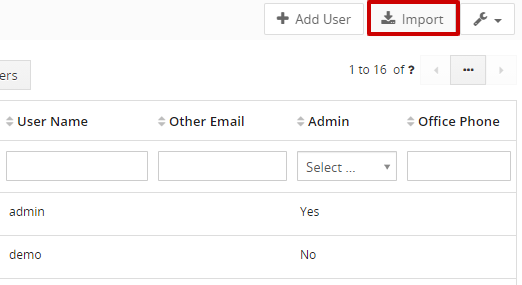
How to Import Users?
If you have a user list on your local computer and you want to add them as users in the CRM so that you can import the user list. Once when the import is successful, the imported users can log in to the CRM by using their Username and Password.
To Import Users follow the steps given below:
- Go to the Users list view > Click on the "Import button" on the top right corner of the page.
A. Upload CSV File
- Click on Select File from My Computer.
- Browse and select a file through your computer.
- Choose the type of Character Encoding.
- Choose a delimiter like Comma, Semicolon, Pipe, Caret it helps you separates the items in the CSV file.
- Click on Next.

B. Set up Field Mapping.
- You will need to map the fields in your CSV file to the CRM fields.
- Click on the Import button.
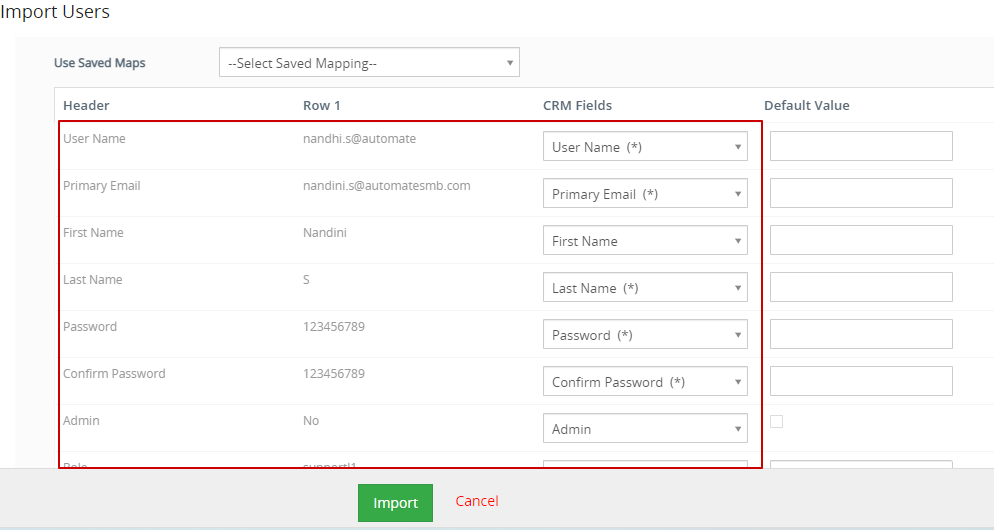
- You can "Save as Custom Mapping" by providing the name, for future imports by clicking on the checkbox.

- This Mapping will appear in the "Used Save Maps".

The Import process will generate a report showing:
- Records successfully import.
- Records Created.
- You can also import more records by clicking on the "Import More" button.
-
Click on the "Finish" button.

How to Export Users?
Exporting is the process of transferring the data from the CRM to your local computer.
- Go to the Users list view > Click on the "Setting" on the top right corner of the page.
- Select "Export", the data starts Exporting.
