How can we set up Custom Fields and Layouts?
Let us take the example of the "Contacts Module", to create Custom Fields and Layouts follow the steps given below:
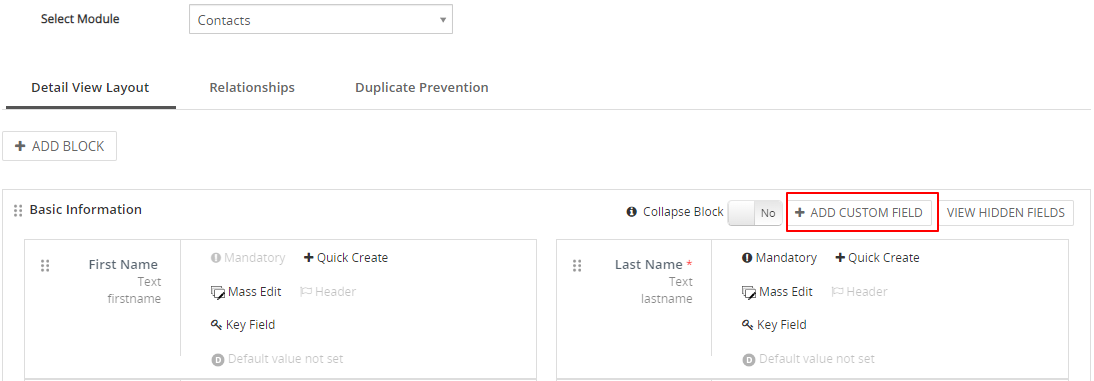
- Go to CRM Settings > Module Management > Module Layouts and Fields.
- "Select Module" from the drop-down.
-
Click on the "Add Custom Field" button on the right corner of the page.
-
In the "Create Custom Field" popup, fill the required information.
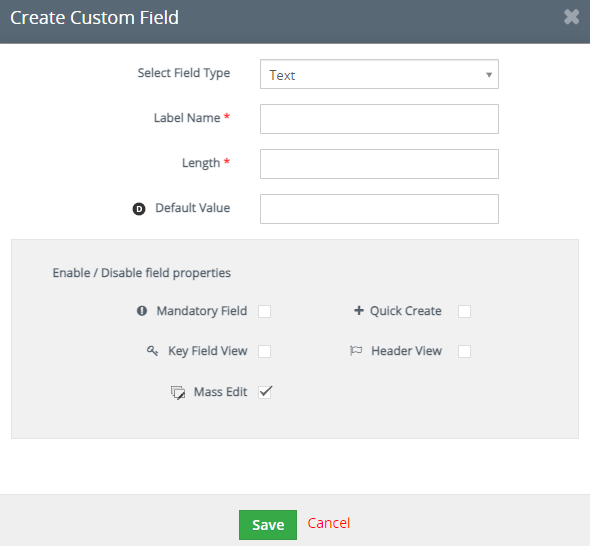
| Fields Type | Description | Fields Information |
|---|---|---|
| Text | You can add Alphabets, Numbers, and many more in the Text field |
Label Name: Provide the Label Name Length: Provide the size of the field (maximum characters is 255) |
| Decimal | A decimal to put point after two integer |
Label Name: Provide the Label Name Length: Provide the size of the field (maximum characters is 255) Decimal: Provide the number of decimal |
| Integer | Integer field includes only the numerical |
Label Name: Provide the Label Name Length: Provide the size of the field (maximum characters is 255) |
| Percentage | You can add the Percentage |
Label Name: Provide the Label Name |
| Currency | You can add the Currency values |
Label Name: Provide the Label Name Length: Length should be less than or equal to 59 |
| Date | You can add the Date |
Label Name: Provide the Label Name Default Value: You can select the Date |
| Provide the valid Email |
Label Name: Provide the Label Name |
|
| Phone | Provide the valid phone number |
Label Name: Provide the Label Name |
| Picklist | The picklist is basically to add drop-down values |
Label Name: Provide the Label Name Picklist Values: provide the Picklist Values |
| URL | Provide the valid website address |
Label Name: Provide the Label Name |
| Checkbox | Provide the Checkbox field to enable/disable |
Label Name: Provide the Label Name |
| Text Area | You can add text as many as the character you want, there is no limit |
Label Name: Provide the Label Name |
|
Multi-Select Combo Box |
You can add a picklist field and select multiple values |
Label Name: Provide the Label Name |
|
Skype |
You can add a skype id |
Label Name: Provide the Label Name |
|
Time |
Add the time |
Label Name: Provide the Label Name Default value: select the Time |
|
DateTime |
Add the Date and Time |
Label Name: Provide the Label Name |
You can view the internal field name like First Name, Last Name in the Fields, and Layout.
Enable/Disable field properties

| Field Properties | Description |
|---|---|
| Mandatory Field | You can make the Field Mandatory for the users to fill in the information by clicking on the checkbox |
| Key Field View |
Key Fields are those which allow you to configure the field you would like to show in the summary view of a record |
| Mass Edit |
Mass Edit Field allows you to make the field available during Mass Edit by clicking on the checkbox |
| Quick Create |
Quick create field allows you to make the field available in the Quick create popup by clicking on the checkbox |
| Header View |
Header View Field allows you to display the field as a header in the Detail View by clicking on the checkbox |
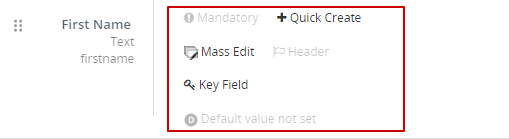
Alternatively, you can also click on the fields like Mandatory, Mass edit, Key Field, Quick Create fields next to your field to enable/disable the field properties.
How to Create a Custom Block?
Custom Block is the predefined set of blocks and fields that organize and store information in each Module.
To create a Custom Block follow the steps given below:
-
Click on "Add Block" on the left corner of the page.
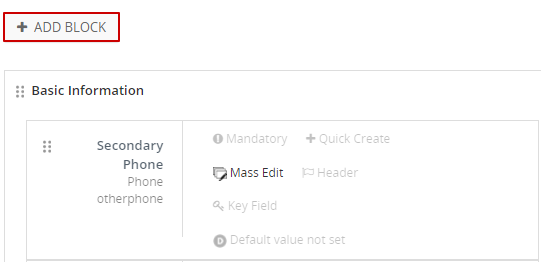
- In the "Add Block" popup, provide the "Block Name" example Contact Details.
- Select the "Add After" field from the drop-down.
- Click on the Save button.

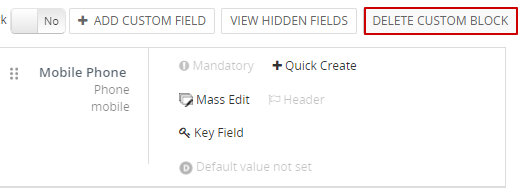
Can we delete a Custom Block and a Custom Field?
Yes, we can Delete the Custom Block and Custom Field in Module Fields and Layouts, by click on the "Delete the Custom Block".
You can Delete a custom Block by following the simple steps given below:
-
Click on the "Delete the Custom Block" button on the right corner of the page.
You can delete the Custom Field by following the simple steps given below:
- Click on the "Delete the Custom Field".
How to Rearrange the Module Layouts?
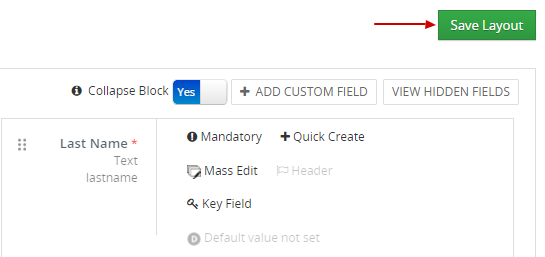
To Rearrange the Custom Fields follow the steps given below:
- Select the Field by drag and drop the Field to the desire location, after rearranging the Fields.
- Click on "Save Layout" on the right corner of the page.
What is Collapse Block, how can we set up a Collapse Block?
It is a set of blocks to Collapse on the Detail View of the record.
To set up a Collapse Block follow the steps given below:
-
Click on the Collapse Block by clicking the Yes/No button.

-
You can see that the block is collapsed in the detailed view.

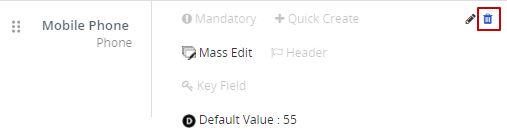
How to Hide Fields?
Hide Fields enables you to Hide the Fields so that they are invisible to Users. Hide Fields can be restored whenever required.
-
Click on the "Edit icon" to hide the fields.
- The "Edit Field properties" popup has a set of options that can be configured on the selected Module.
- Push the "Show Field icon to No" to Hide the Field.

How to restore the Hidden Field?
-
Click on the "View Hidden Fields" on the right corner of the page.
- In the "Inactive Fields" popup, click on the checkbox to make the hidden fields Reactive.
- Click on the Reactive button.

Alternatively, you can create the Custom Field from the Corresponding Module.
- Click on the "Contact Module".
- Click on the "Customize" on the top right corner of the page.
- Select "Contacts Module and Layouts Fields" on the top right corner of the page.

Relationship
The relationship helps you to link two different modules and relate records between them. An Admin can create a custom relationship from Modules Layouts and Fields. automate CRM helps to create "One to One", "One to Many", "Many to One", and "Many to Many" relationships between the modules.
- One-one relationship
In One-One Relationships type. The records in module 1 and module 2 are related uniquely. A field gets created in both the module to represent the related records.
For example, The one contact record will have one unique Report To, then you can create a One-One relationship between Contacts and Reports To.

- Many-one relationships
The Many-One relationship type indicates that one record can be related or linked to multiple modules.
For example, The Organization module can have multiple contacts linked to it, then you can create Many-One relationships.

- Many-Many relationships
In Many-Many relationship type, indicates that multiple records in Module1 and Module2, there will not be a unique relationship in module1 and Module2.
For example, there are Many-Many relationship in Activities and Email module.

- One-Many relationships
In One -Many relationships type, indicates that module1 (Parent Module) can be related to or linked to the multiple secondary modules (Child Module).
For example, let us consider Contact as a parent module and it can have multiple Opportunities, Tickets, Sales Order ( Child modules) related to one unique Contact record.

How to rearrange the related tabs in a module?
- Go to Relationships and rearrange the module by drag and drop action.
- Click on the Save button.

How to delete a Relationship?
- You can delete a Custom Relationship by clicking on the delete icon.

Duplicate Prevention
You can prevent the creation of Duplicate records from any source if you enable the duplicate record check feature.
- Click on the "Duplicate Prevention" and "Enable the Duplicate check".
-
Select the unique fields on which duplicate records are to be checked to detect duplicates, relevant to the Contacts Module, you can select the field from the drop-down like Mobile Phone, Primary Email, Secondary Phone.

- Choose the action to be performed if duplicate records are found while syncing with an external application.
- Prefer the latest record.
- prefer internal record.
-
prefer external record.
